
Provisioning infrastructure manually takes a lot of time, and scripting requires a lot of technical skills. In this article, “Getting Started with Terraform,” I will cover everything about HashiCorp’s Terraform, an Infrastructure as Code (IaC) tool that makes it easy to set up infrastructure with a focus on Amazon Web Services (AWS). I will discuss what you need to do before we start, how to get access to AWS, how to make a simple Terraform setup, and how to change your infrastructure. You will have the basic knowledge and skills you need to use Terraform to build infrastructure.
Table of Contents
Introduction to Terraform
How Terraform work?

Terraform is a tool that creates and manages resources on cloud platforms and services using their APIs. It works with various platforms and services, including AWS, Azure, GCP, Kubernetes, Helm, GitHub, Splunk, and DataDog. The basic workflow consists of three stages: Write, Plan, and Apply. Write involves defining resources across multiple providers, Plan describes the infrastructure it will create, update, or destroy, and Apply performs the proposed operations in the correct order, respecting resource dependencies.
Terraform Configuration with HCL
Terraform configuration is an extensive Terraform language document that maintains an infrastructure collection consisting of many files and folders. It utilizes blocks as content containers and represents object configurations similar to resources. Terraform is declarative, focusing on the desired outcome rather than the steps required to achieve it. The language has a small number of top-level block types, arguments, identifiers, and comments. Terraform configuration offers both native Terraform language syntax for simple reading, editing and JSON-compatible syntax for programmatic configuration development.
Setting Up
AWS Account Creation
Before you can start provisioning resources with Terraform on AWS, you’ll need an AWS account. If you haven’t created one yet, follow the steps in our blog post on AWS account creation. How to Create an AWS Account. Once you have your AWS account set up, you can proceed with the Terraform installation, or revisit it before proceeding with Terraform execution against the AWS account.
Installing Terraform
Manual Installation
Download Terraform Binary:
Open a web browser and go to the Terraform downloads page: Terraform Downloads
Under the Binary download section, click on the AMD64 (based on your system architecture) link
Extract the Terraform Binary:
Once the download is complete, use the unzip command to extract the Terraform binary from the downloaded zip file
unzip terraform_<VERSION>_linux_amd64.zipMove the Terraform Binary to a Directory in Your PATH:
To make Terraform accessible from anywhere in the terminal, move the extracted binary to a directory that is included in your system’s PATH environment variable.
sudo mv terraform /usr/local/bin/
Alternatively, you can use our download and install script:
Just run this one-line script to get Terraform and move its binary from the zip file to /usr/local/bin/
sudo wget --show-progress -O terraform.zip $(curl -sL https://releases.hashicorp.com/terraform/index.json | jq -r '.versions[].builds[] | select(.os == "linux" and .arch == "amd64" and (.version | test("rc|beta|alpha") | not)) | .url' | tail -n 1) && sudo unzip -o terraform.zip -d /usr/local/bin/ && sudo rm terraform.zip
This script will download the latest version of Terraform, unzip it, and move the binary to /usr/local/bin/. Make sure you have jq and unzip installed on your system for this script to work.
Verify Installation:
Open a new terminal window and run the following command to verify that Terraform is installed and accessible:
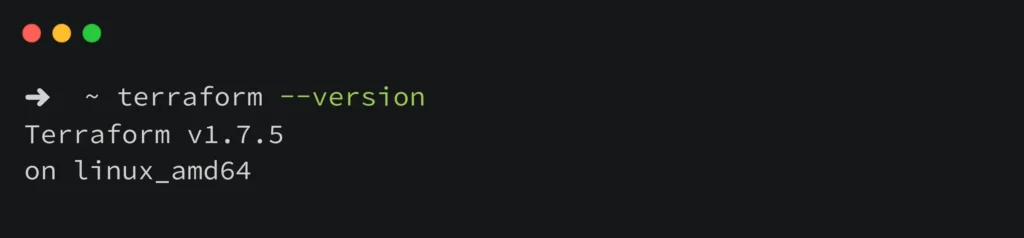
terraform --version
You should see the installed Terraform version displayed in the output.
🎉 Congratulations! You have successfully installed Terraform! 🎉
And that’s it! You have successfully installed Terraform manually on Linux. You can now use Terraform to provision and manage your infrastructure as code.
Linux Package Installation
Install Terraform via Package Manager:
On Linux systems, you can install Terraform using your distribution’s package manager. For example, on Debian-based systems (like Ubuntu), you can use the apt package manager.
Ensure that your system is up-to-date and you have installed the necessary packages
sudo apt-get update && sudo apt-get install -y gnupg software-properties-common
Install the HashiCorp GPG key
wget -O- https://apt.releases.hashicorp.com/gpg | \ gpg --dearmor | \ sudo tee /usr/share/keyrings/hashicorp-archive-keyring.gpg > /dev/null
Verify the key’s fingerprint
gpg --no-default-keyring \ --keyring /usr/share/keyrings/hashicorp-archive-keyring.gpg \ --fingerprint
Add the official HashiCorp repository to your system
echo "deb [signed-by=/usr/share/keyrings/hashicorp-archive-keyring.gpg] \ https://apt.releases.hashicorp.com $(lsb_release -cs) main" | \ sudo tee /etc/apt/sources.list.d/hashicorp.list
Download the package information from HashiCorp
sudo apt update
Install Terraform from the new repository
sudo apt-get install terraform
These steps will ensure that you have the latest version of Terraform installed on your Ubuntu/Debian system.
Additionally, for installation steps on more Linux flavors, please visit https://developer.hashicorp.com/terraform/tutorials/aws-get-started/install-cli#install-terraform.
Verify Installation
After the installation process completes, you can verify that Terraform has been installed successfully by running terraform --version command.
You should see the Terraform version information printed in the terminal.
These steps show how to install Terraform manually by downloading the binary from the official website and how to install it on Linux systems using the package manager.
Understanding Terraform Basics
Terraform Settings
Terraform settings are a type of configuration block used to configure Terraform’s behavior, such as requiring a minimum version. Each block can contain various settings related to Terraform’s behavior, but only constant values can be used. Arguments may not refer to named objects or use built-in functions.
Syntax:
terraform {
  // Configuration settings for the terraform
}
Example:
terraform {
  required_providers {
    aws = {
      source  = "hashicorp/aws"
      version = ">= 2.7.0"
    }
  }
}
Official reference: Terraform Settings
Terraform Blocks Types
Resources
Resources serve an essential role in the Terraform language. Every resource block provides information about various infrastructure components, including virtual networks, compute instances, and higher-level components like DNS records.
Syntax:
resource "<resource_type>" "<resource_name>" {
  // Configuration settings for the resource
}
Example:
resource "aws_instance" "web_server" {
  ami           = "ami-051f8a213df8bc089"
  instance_type = "t2.micro"
  tags = {
    Name = "web-server"
  }
}
Official reference: Resources
Data
Data blocks define external data sources that Terraform can query to obtain information during configuration.
Syntax:
data "<data_source_type>" "<data_source_name>" {
  // Configuration settings for the data source
}
Example:
data "aws_ami" "example_ami" {
  most_recent = true
  owners      = ["self"]
  tags = {
    Name = "example-ami"
  }
}
Official reference: Data
Providers
Terraform uses providers to communicate with cloud providers, SaaS providers, and other APIs. Most providers set up an infrastructure base, either in the cloud or on their servers. They can also offer local tools like random numbering for resource names. Without providers, Terraform would not be able to manage any type of infrastructure.
Each provider is responsible for translating Terraform configurations into API calls specific to the target platform.
Syntax:
provider "<provider_name>" {
  // Configuration settings specific to the provider
}
Example:
provider "aws" {
  region = "us-east-1"
}
Provider Tiers & Namespaces
Terraform providers come from various sources, including HashiCorp, HashiCorp Technology Partners, and the Terraform community. The Registry categorizes providers into tiers, using namespaces to indicate their source. Official Tier providers are owned by HashiCorp, while Partner Tier providers are maintained by third-party companies. Community Tier providers are published by maintainers, and Archived Tier providers are no longer maintained by HashiCorp or the community.
Terrafrom Provider Registry: Terrafrom Registry

Official reference: Providers
Variables
Variable blocks in Terraform let you change settings based on parameters. This lets you make changes to Terraform modules without changing their source code. Modules can be shared between different configurations, which makes them composable and useful. In the root module, variables can be set with CLI options and environment variables. In child modules, on the other hand, values are passed in the module block.
Syntax:
variable "<variable_name>" {
  // Type and other optional settings for the variable
}
Example:
variable "instance_type" {
  type    = string
  default = "t2.micro"
}
Official reference: Variables
Outputs
Output values in Terraform allow you to share information about your infrastructure, making it accessible on the command line and enabling other Terraform configurations to use this information. In simple words, output blocks define values that Terraform should display after applying the configuration.
Syntax:
output "<output_name>" {
  value = <expression>
}
Example:
output "instance_ip" {
  value = aws_instance.web_server.public_ip
}
Official reference: Outputs
Modules
Modules are containers for multiple resources, consisting of .tf and or .tf.json files in a directory, Module blocks define the use of Terraform modules to encapsulate and reuse configurations.
Syntax:
module "<module_name>" {
  // Configuration settings for the module
}
Example:
module "app_server" {
  source = "./modules/app_server"
  instance_count = 3
  instance_type  = "t2.micro"
}
Terrafrom Module Registry: Module Registry
Official reference: Modules
Checks
The check block is a feature in Terraform that allows for the validation of infrastructure beyond the typical resource lifecycle, bridging the gap between post-apply and functional validation. It allows for the definition of custom conditions that execute on every Terraform plan or operation without affecting the overall operation status. It is only available in Terraform v1.5.0 and later.
Syntax:
check "<local_name>" {
  data "<data_source_type>" "<data_source_name>" {
    // Configuration settings for the data source
  }

  assert {
    condition     = <boolean_expression>
    error_message = "<error_message>"
  }
}
Example:
check "health_check" {
  data "http" "terraform_io" {
    url = "https://www.terraform.io"
  }

  assert {
    condition     = data.http.terraform_io.status_code == 200
    error_message = "${data.http.terraform_io.url} returned an unhealthy status code"
  }
}
Official reference: Checks
Import
The import block is a configuration-driven method for importing existing infrastructure resources into Terraform. It works with CICD pipelines and allows previewing of import operations before modifying state. Once imported, Terraform tracks the resource in your state file, allowing for standard resource lifecycle management. The import block records that Terraform imported the resource, not created it. After importing, you can remove or leave them as a record of the resource’s origin. Import blocks are only available in Terraform v1.5.0 and later.
Syntax:
import {
  to       = <resource_address_in_state_file>
  id       = <existing_resource_id>
  provider = <optional_provider_name>
}
Example:
import {
  to       = aws_instance.example
  id       = "ami-051f8a213df8bc089"
}
Official reference: Import
Terraform Configuration and Workflow
Using Terraform manifest file
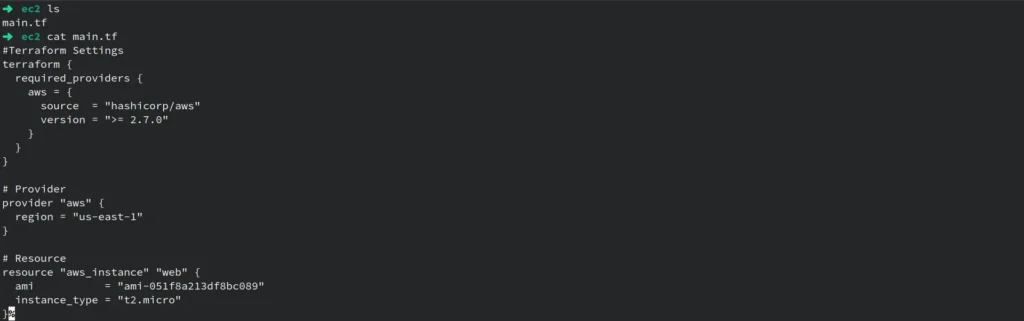
The main.tf file serves as the main configuration file for Terraform, allowing us to define infrastructure resources and their desired states in declarative language. Terraform utilizes HashiCorp Configuration Language (HCL) to express the desired state of your infrastructure, making it human-readable and easy to understand.
It is essential to note that, while we use the file name main.tf for tutorial purposes, this is not required. Using the name main.tf is regarded as best practice for organizing Terraform configurations.
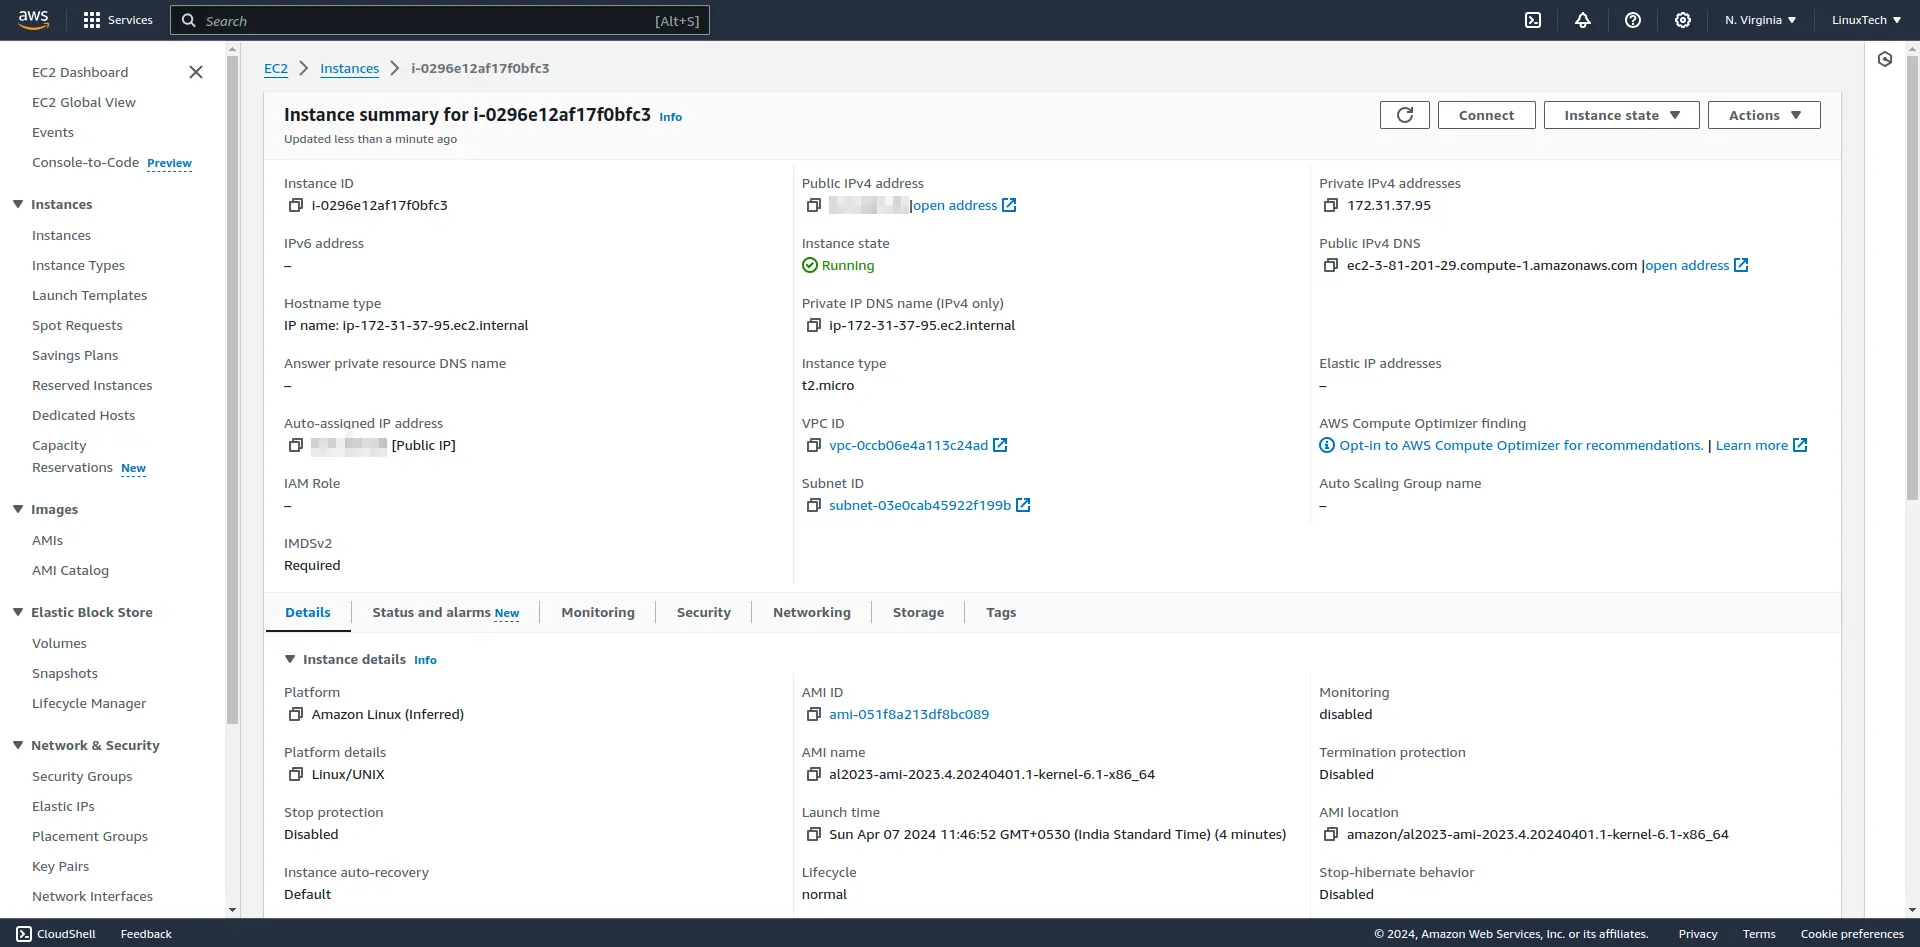
The Terraform manifest file main.tf is used in the article to configure the infrastructure for deploying an AWS EC2 instance. It requires the HashiCorp AWS provider to have a version of at least 2.7.0, configured for the “us-east-1” region. The manifest declares an aws_instance resource named “web” that specifies the desired Amazon Machine Image (AMI) ID and instance type t2.micro. This configuration serves as a basic example and can be expanded with additional resources and configurations to support a comprehensive infrastructure deployment.
We will look at each of the sections we defined in the Terraform manifest file in more detail.
Terraform Settings
#Terraform Settings
terraform {
  required_providers {
    aws = {
      source  = "hashicorp/aws"
      version = ">= 2.7.0"
    }
  }
}
The terraform configuration block is used for setting up Terraform’s behavior. It includes the required_providers block, which identifies the required providers, version constraints, and source addresses. This ensures Terraform uses the specified aws provider for deploying the module. Other settings, like required_version and backend settings, can also be defined.
For detailed information about the terraform block, refer to the Terraform Settings – terraform Block documentation.
Provider Configuration
# Provider
provider "aws" {
  region = "us-east-1"
}
The provider block in Terraform configures and specifies the details of a specific provider, such as AWS, Azure, or Google Cloud. It outlines the provider type, specific arguments, and authentication details. This block is crucial for Terraform configuration, allowing ideal management of infrastructure across different cloud platforms and services.
For detailed information about provider configuration, refer to the Terraform Providers documentation.
Resource Blocks
# Resource
resource "aws_instance" "web" {
  ami           = "ami-051f8a213df8bc089"
  instance_type = "t2.micro"
}
Terraform defines resources as declared entities representing infrastructure components like EC2 instances, S3 buckets, and VPCs. These blocks have type, name, attributes, and provider associated with them. They allow Terraform to define, manage, and update resources based on the configuration’s desired state, allowing for efficient management and configuration.
For detailed information about resource declaration, refer to the Terraform Resources documentation.
Core Terraform Workflow

Terraform Init
The terraform init command initializes a new directory or configuration by downloading the required provider plugins and modules, setting up everything Terraform needs to run your configuration.
terraform init
Run terraform init in your terminal within the directory containing main.tf.

Terraform Validate
Terraform validates configuration files to ensure syntactically correct and internally consistent settings, ensuring proper formatting and valid references to resources and variables.
terraform validate
After creating or modifying your main.tf, run terraform validate to ensure there are no syntax errors.

Terraform Plan
The Terraform plan generates an execution plan based on the current configuration and infrastructure state, calculating actions to achieve the desired state, enabling users to preview Terraform’s actions before making changes.
terraform plan
Run terraform plan to see the proposed changes Terraform will make based on your configuration.

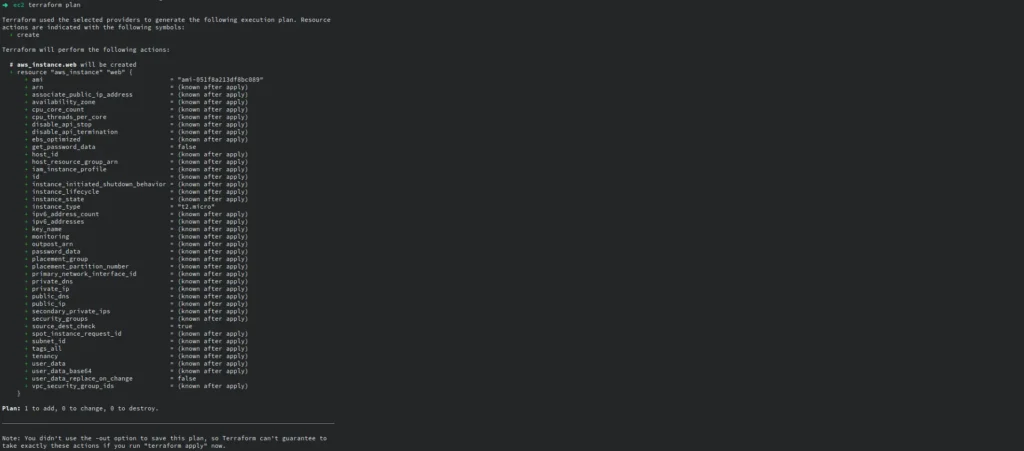
When Terraform executes the plan, resources that prefixed with a “+” will be added, which means that new resources will be made. On the other hand, things that prefixed with a “–” will be destroyed, which means they will be taken away.
Terraform Apply
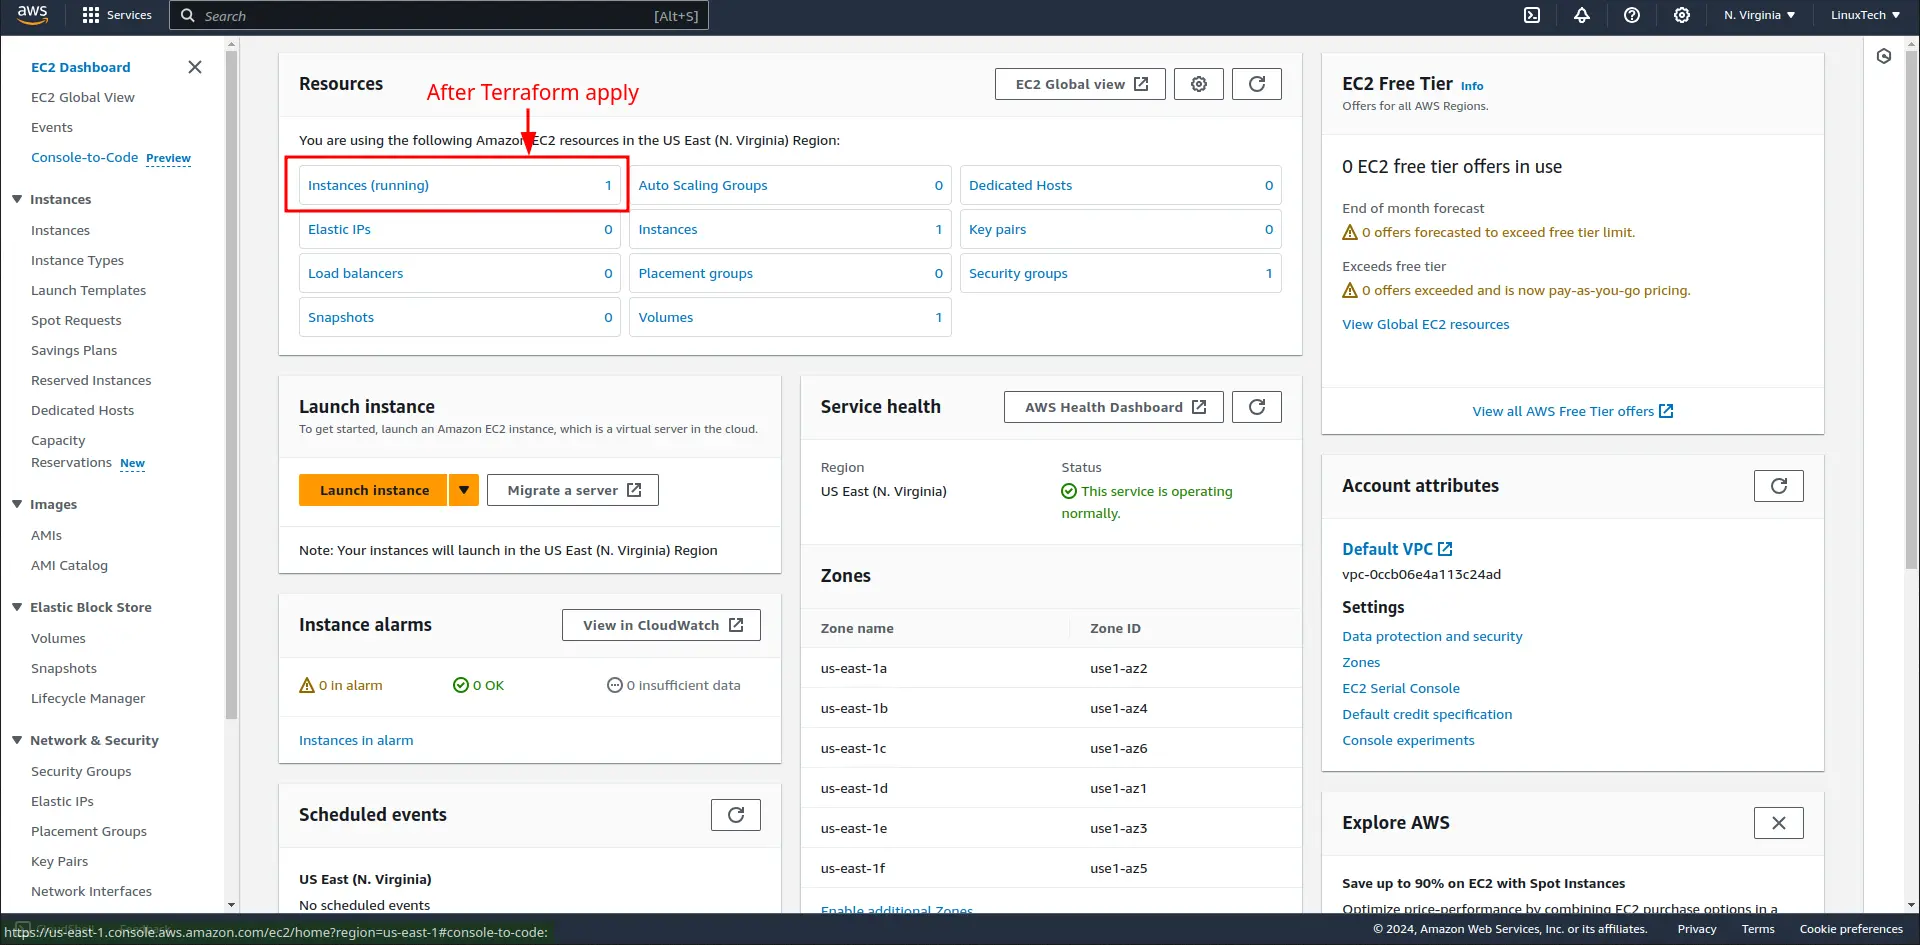
The terraform apply command applies the changes in the execution plan, creating, updating, or deleting resources to achieve the desired state in the configuration.
terraform apply
After reviewing the execution plan, run terraform apply to apply the changes and provision resources.

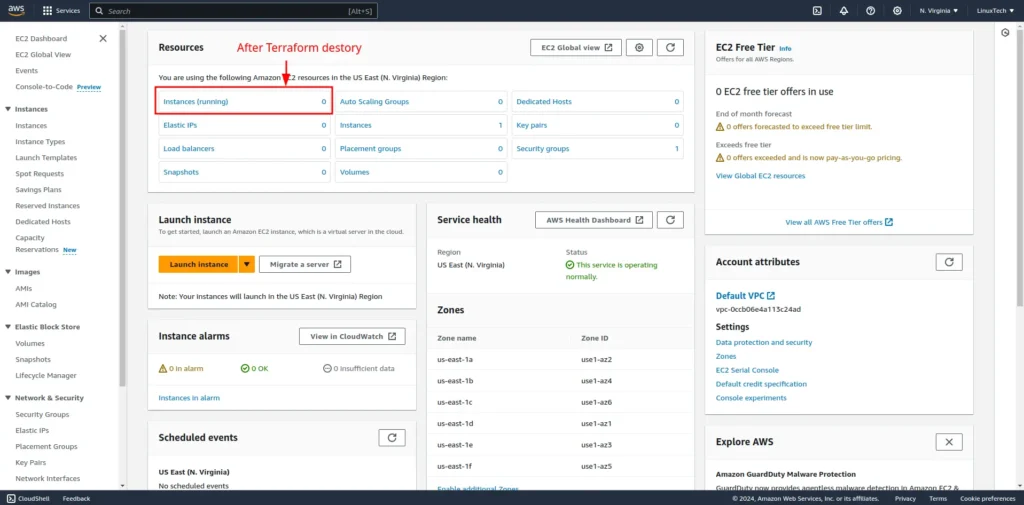
Terraform Destroy
The Terraform destroy command removes all resources managed by Terraform within the configuration, leaving no trace of the resources created within the infrastructure.
terraform destroy
When you no longer need the provisioned resources, run terraform destroy to remove them and clean up your infrastructure.

Terraform Language and Syntax
Terraform Language (HCL) Syntax
A Terraform configuration is a comprehensive Terraform language document that outlines how to manage an infrastructure collection, which includes multiple files and directories.
Basic Elements Of HCL
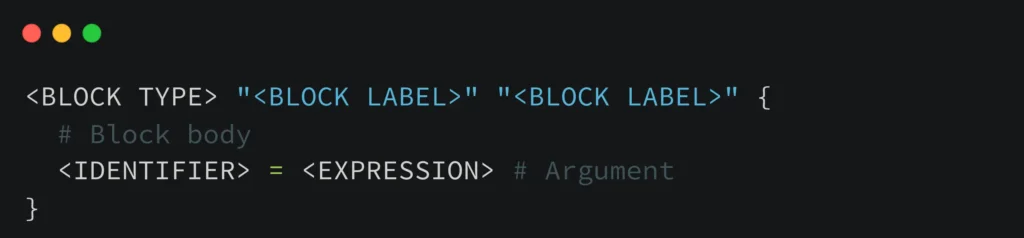
Terraform HCL is a language that uses blocks as containers for content and represents the configuration of objects, like resources. Blocks have a block type, can have labels, and can contain arguments and nested blocks. Top-level blocks in a configuration file are responsible for controlling most Terraform features. Arguments assign values to names within blocks, while expressions represent values. Terraform is declarative, focusing on the intended goal rather than the steps to achieve it.
Sample resource based on the HCL
# Resource
resource "aws_instance" "web" {
  ami           = "ami-051f8a213df8bc089"
  instance_type = "t2.micro"
}
lower-level syntax
Blocks
A block in the Terraform language has a type (resource) and defines the number of labels required. The block body is delimited by { and } characters, and further arguments can be nested. Terraform uses a limited number of top-level block types, which implement most features like resources, input variables, output values, and data sources.
Arguments
The argument name is placed before the equals sign, while the expression after it represents the argument’s value. Valid value types vary based on context, but some accept arbitrary expressions.
Identifiers
Identifiers in Terraform include argument names, block type names, and construct names. They can contain letters, digits, underscores, and hyphens, and Terraform uses Unicode syntax with ASCII hyphens.
Comments
The Terraform language offers three syntaxes for comments: #, //, and /* and */. The default single-line comment style is #, but automatic configuration formatting tools may convert // comments to # due to convention.
Character Encoding and Line Endings
Terraform configuration files must be UTF-8 encoded, accepting non-ASCII characters in identifiers, comments, and string values. It accepts Unix-style line endings (LF only) or Windows-style line endings (CR then LF).
Terraform configurations use native Terraform language syntax for easy reading and updating, but also support JSON-compatible syntax for programmatic configuration generation. Terraform expects native syntax for files named with a .tf suffix, and JSON syntax for files named with a .tf.json suffix.
Arguments, Attributes, & Meta-Arguments.
Terraform resources are composed of arguments, attributes, and meta-arguments. We will explore each of the areas.
Arguments
Terraform uses arguments to configure specific infrastructure resources, representing the desired state or configuration parameters. Arguments are key-value pairs used to specify the configuration details for a resource within Terraform. For instance, when defining an AWS EC2 instance, arguments include instance type instance_type, Amazon Machine Image ID ami, and other settings like networking and security. Arguments can be mandatory or optional, and failing to provide a required argument can result in Terraform reporting an error during execution.
resource "aws_instance" "example" {
  instance_type = "t2.micro"
  ami           = "ami-051f8a213df8bc089"
  count         = 3  # Optional argument
}
Official reference for aws_instance Arguments: Argument Reference
Attributes
Attributes are properties or details of a resource that Terraform can retrieve and utilize within your configuration. They are read-only and reflect the current state of the managed resource, such as the instance ID id and public IP address public_ip provided by the cloud provider’s API. These attributes are accessed using the resource_type.resource_name.attribute_name syntax
output "instance_id" {
  value = aws_instance.example.id
}
Official reference for aws_instance Attributes: Attribute Reference
Meta-Arguments
Meta-arguments in Terraform are directives that modify resource configurations, allowing advanced functionality like resource repetition, dependencies, and lifecycle management. These are built into to Terraform and not tied to any specific resource or provider. They enhance the flexibility and control of Terraform configurations by allowing higher-level management of resource behavior and relationships, thereby enhancing the overall functionality of the platform.
resource "aws_instance" "example" {
  instance_type = "t2.micro"
  ami   = "ami-051f8a213df8bc089"
  count = 3  # Using count meta-argument to create three instances
}
Official documentation for Meta-Arguments: depends_on, count, for_each, provider and lifecycle
Managing Terraform State
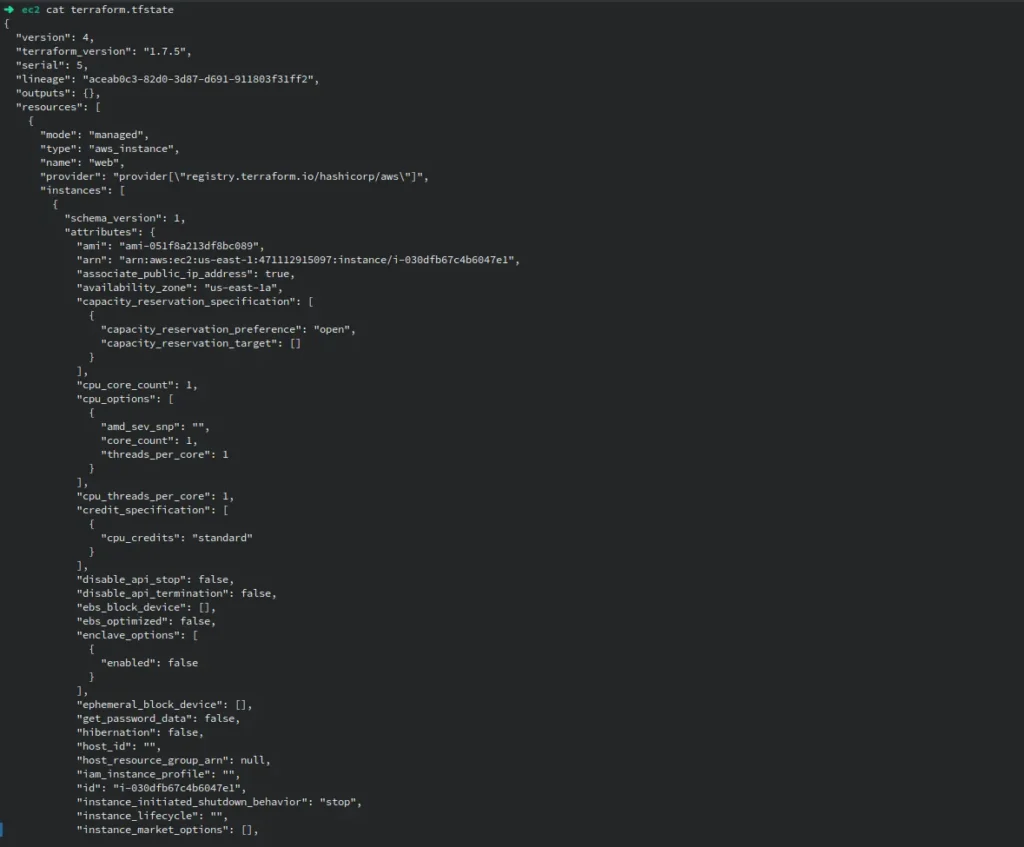
Terraform State File
The primary source of truth for the infrastructure handled by Terraform is the Terraform state file, or terraform.tfstate, a JSON file. The state file contains the following key information:
Configuration of Resources
The configuration of every resource that Terraform manages is kept track of in the state file. Resource kinds, characteristics, and any designated settings fall within this category.
Metadata for Resources
Terraform utilizes the IDs, names, and other identifiers that are captured in the state file for each managed resource in order to monitor and manage the resource.
Dependencies
Terraform establishes resource dependencies using the state file. Terraform can now decide which resources to create and update in what order.
Present Situation
Current State
The supplied infrastructure’s current status is reflected in the state file. It contains details on the settings and state (e.g., running, stopped) of resources.
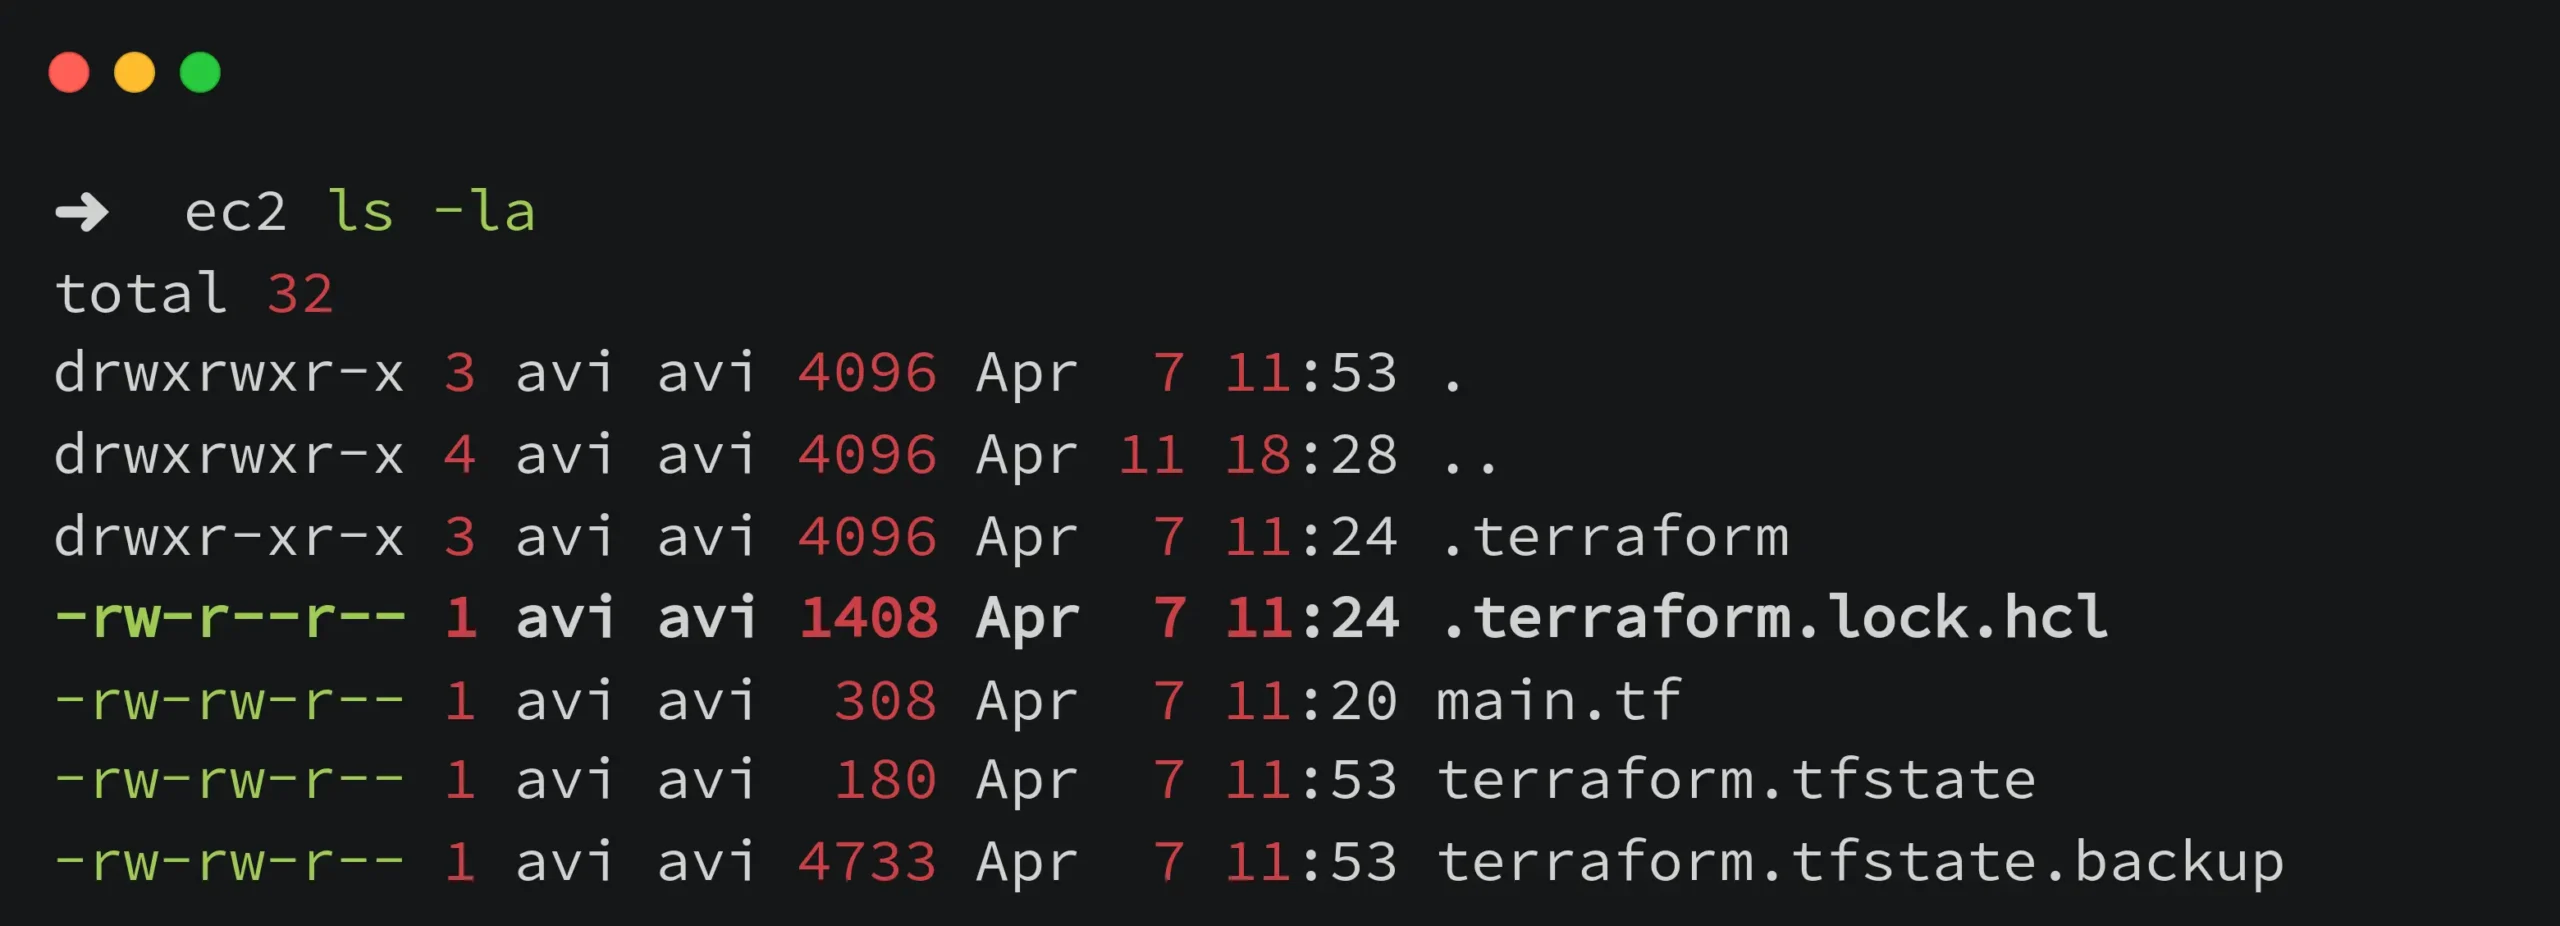
Dependency Lock File
The dependency lock file (terraform.lock.hcl) in Terraform is used to manage and record specific versions of providers and their dependencies for a given Terraform configuration.
- It keeps track of versions for Terraform providers and makes sure that everything is the same across settings and deployments.
- Makes copies possible by keeping track of provider versions, which stops changes or upgrades that come as a surprise.
- Sets exact provider versions to keep development and deployment settings uniform.
- Allows infrastructure installations to be repeated and team members to work together.
- Always named as .terraform.lock.hcl
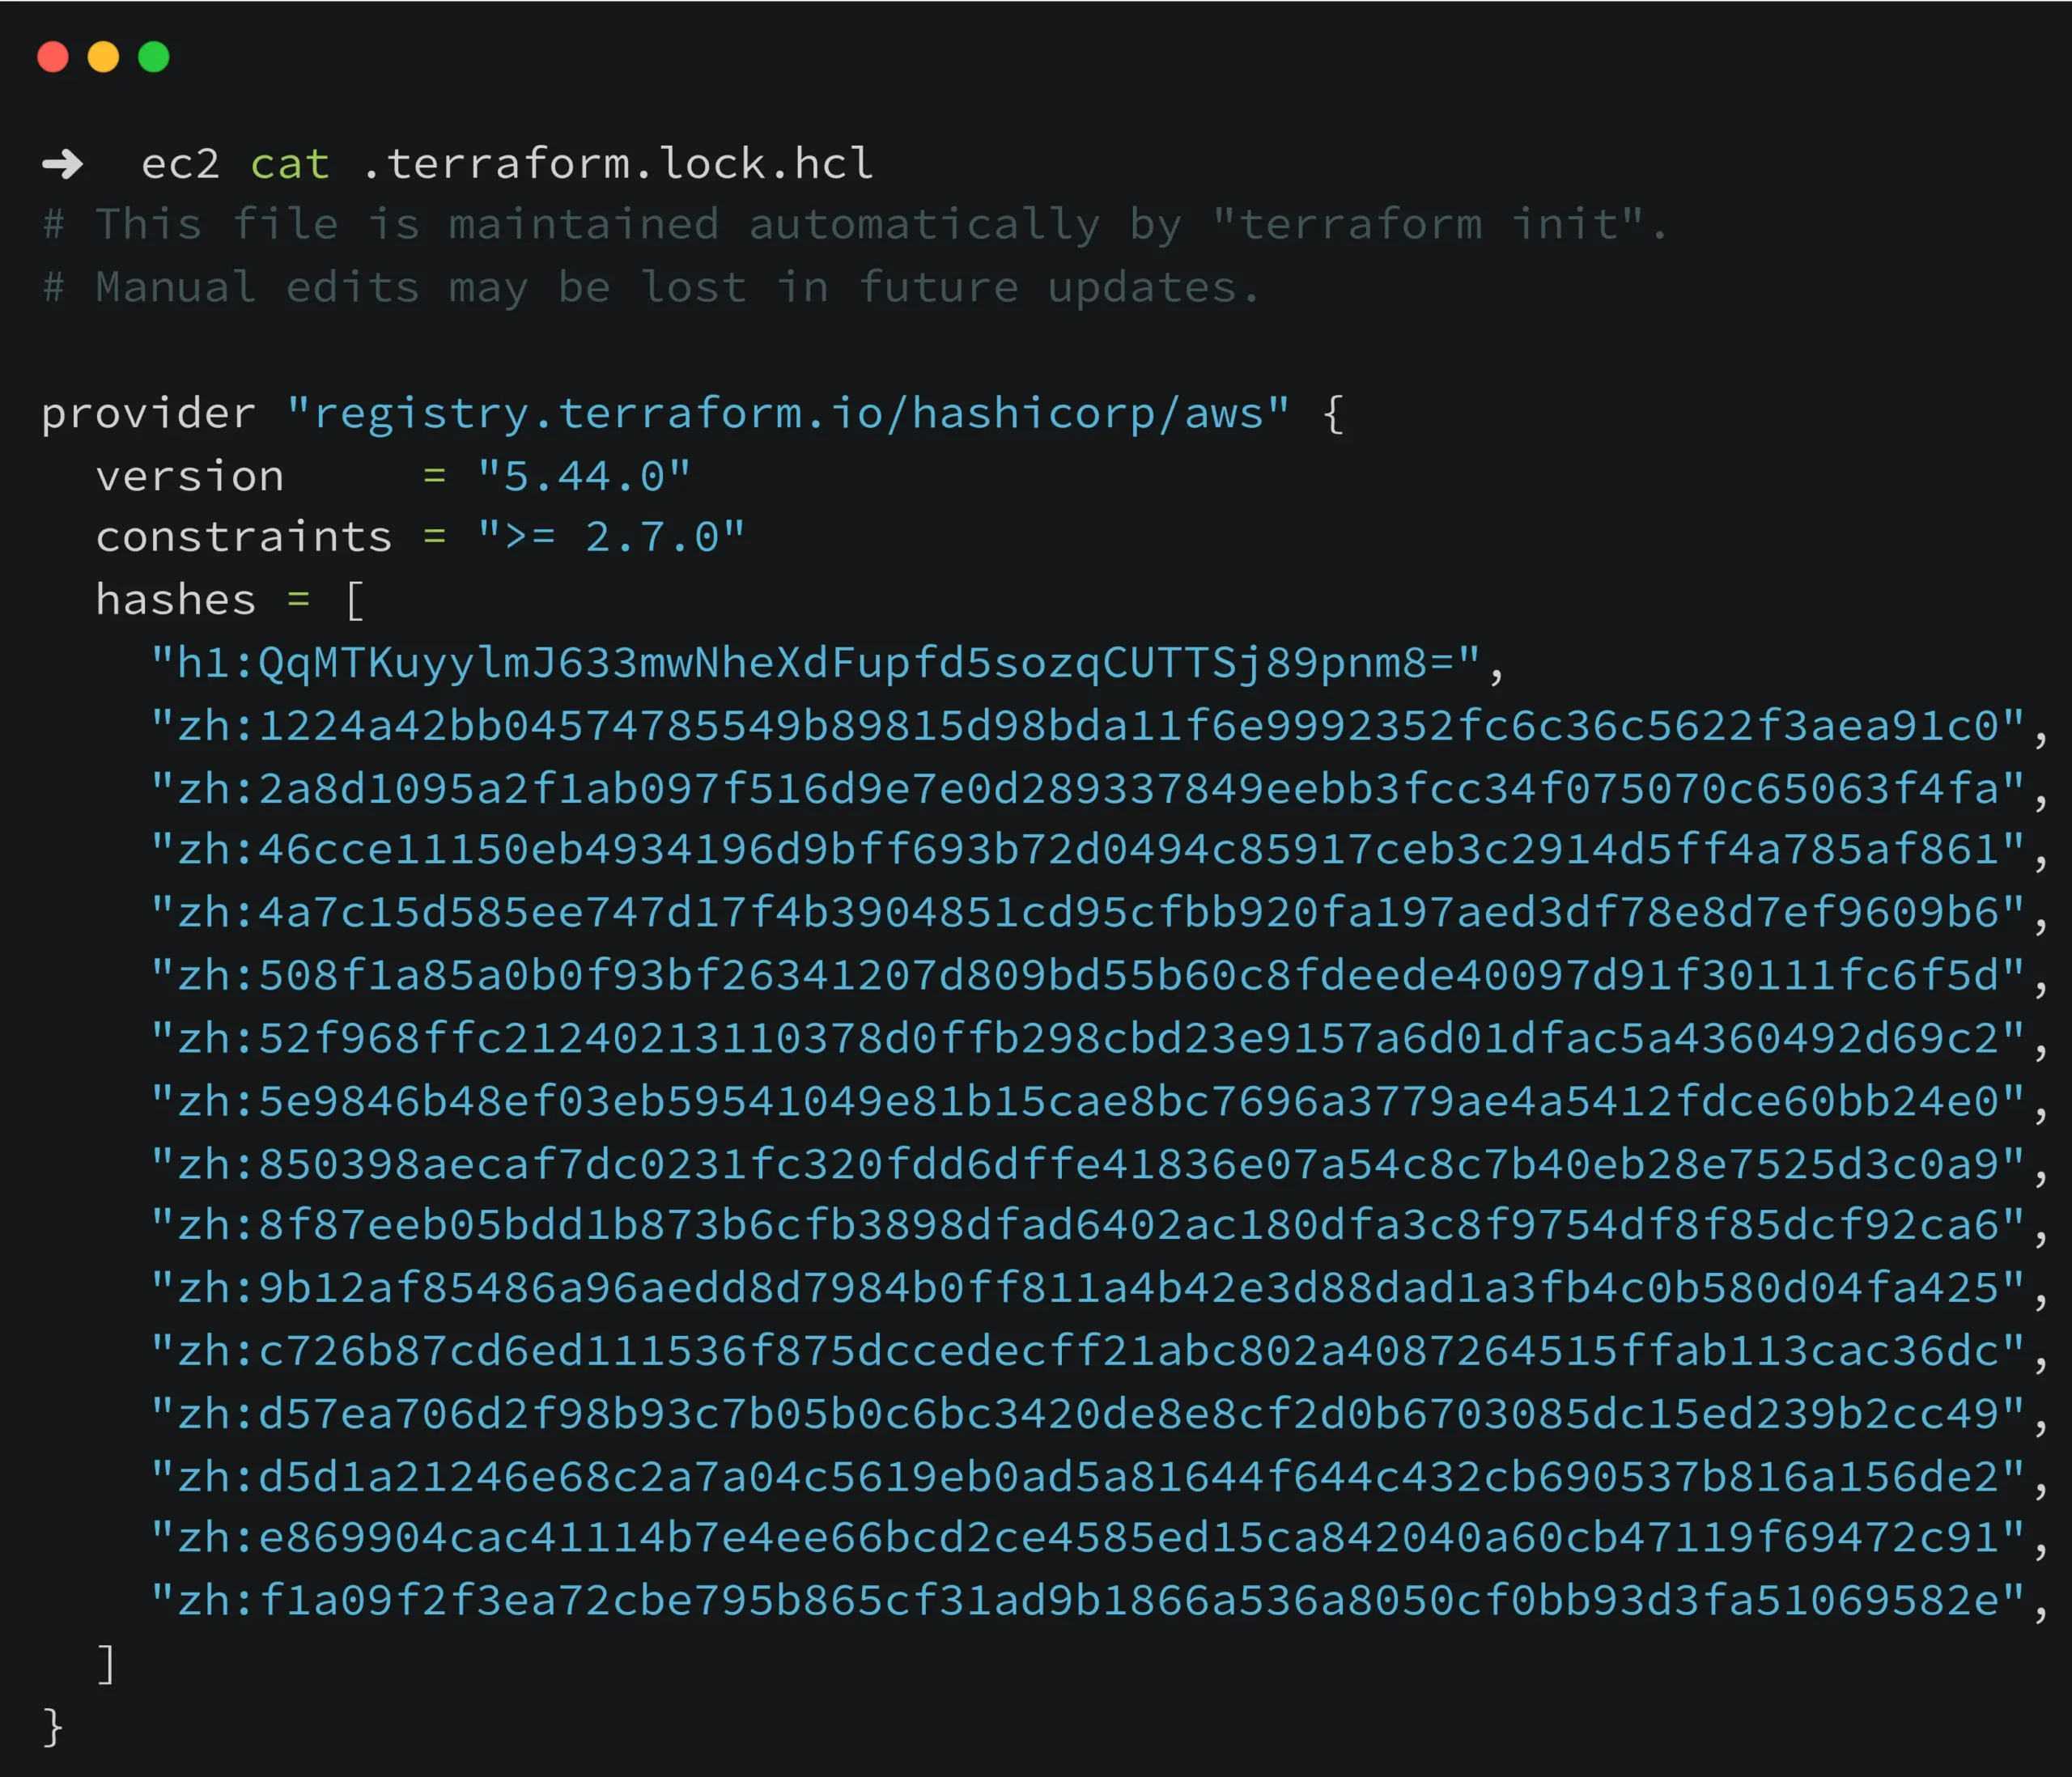
Official reference: Dependency Lock File
Methods of Managing Terraform State
Terraform supports different methods for managing the state file, including local storage, remote backends (e.g., Amazon S3, Terraform Cloud), and locking mechanisms to prevent concurrent state modifications. Managing the state file properly is essential for maintaining the integrity and consistency of infrastructure managed by Terraform.
Terraform provides several approaches to managing state, depending on the complexity of your infrastructure and collaboration requirements:
Local State Storage: By default, Terraform stores state locally in a terraform.tfstate file in the project directory. This method is suitable for individual developers or small projects but is not recommended for production environments or collaborative settings.
Remote State Storage: To support collaboration and scalability, Terraform supports storing state remotely using backend services such as Amazon S3, Azure Blob Storage, Google Cloud Storage, or Terraform Cloud/Enterprise. Remote state storage ensures that all team members can access and manage infrastructure state securely.
Locking Mechanisms: Terraform provides locking mechanisms when using remote state to prevent concurrent modifications. Locking ensures that only one user can modify the state file at a time, reducing the risk of conflicting changes.
Best Practices for Managing Terraform State
To effectively manage Terraform state, follow these best practices:
Use Remote State: Always use remote state storage, especially in team environments or production scenarios. Choose a backend that suits your requirements for security, scalability, and integration.
Enable State Versioning: Configure state versioning to track changes over time. This allows you to roll back to previous states if needed.
Implement Locking: Enable locking to prevent concurrent state modifications and ensure data integrity.
Separate Environments: Maintain separate state files for different environments (e.g., dev, staging, prod) to isolate configurations and minimize risk.
Automate State Management: Use automation tools and scripts to automate state management tasks such as initialization, updates, and backups.
By implementing these practices, you can effectively manage Terraform state and ensure the reliability and consistency of your infrastructure automation workflows. Proper state management is crucial for successful infrastructure provisioning and maintenance with Terraform.
Conclusion
We’ve explored the fundamentals of using Terraform to manage infrastructure as code efficiently. By following these steps, you’ve learned how to set up Terraform, understand its core workflow, leverage the power of HCL for defining configurations, and manage Terraform’s state effectively.
Key takeaways from this tutorial include:
Infrastructure as Code: Terraform enables you to define and manage infrastructure using declarative code, providing consistency and repeatability.
Terraform Workflow: The Terraform workflow involves initializing, validating, planning, applying, and destroying infrastructure changes, ensuring controlled deployments.
HCL Syntax: HashiCorp Configuration Language (HCL) serves as the foundation for writing Terraform configurations, offering a clear and structured approach to defining resources.
State Management: Proper state management is crucial for tracking resource changes and maintaining the desired infrastructure state across teams and environments.
Remember to always test and validate changes in a safe environment before applying them to production. Happy coding with Terraform!
Got any queries or feedback? Feel free to drop a comment below!