Are you trying to figure out how to install AWS CLI? The AWS CLI is a command-line tool provided by Amazon for managing AWS services. It offers a set of commands to perform tasks such as creating EC2 instances, managing S3 buckets, configuring IAM users, and more, all from your terminal or script.
Table of Contents
AWS CLI Version History
AWS CLI has evolved with major updates:
AWS CLI 1.x: Initial version with core functionalities.
AWS CLI 2.x: Enhanced performance, new features (e.g., AWS Single Sign-On), and expanded service coverage.
know more about the updates and new features in version 2 of the AWS CLI.
Installing and Configuring – How to install AWS CLI
AWS CLI versions 1 and 2 use the same aws command name. If you previously installed AWS CLI version 1, see Migrate from AWS CLI version 1 to version 2.
If you have installed the v1 version of the AWS CLI, you must remove it in order to install the most recent version.
You can uninstall the prior installation based on the method you previously installed.
python -m pip uninstall awscli
#Amzaon Linux/ RHEL/ Rocky Linux
sudo yum remove awscli
The package name may change based on the flavour of OS you use; it will either be awscli or aws-cli. Please use the right package name.
Install Using Pip (Cross-platform)
PyPI is recommended for its latest AWS CLI version, seamless Python integration, cross-platform consistency across Windows, macOS, and Linux, ideal for Python virtual environments, package management, easy upgrade with pip install.
Install globally
#Install globally
sudo python -m pip install awscli
Install for your user
#Install for your user
python -m pip install --user awscli
Verify the installation:
aws --version

With the steps above, we have installed AWS CLI version 1, and there is no officially hosted AWS CLI version 2 package. You can use unofficial pip installation for AWS CLI version 2 from https://pypi.org/project/awscliv2/.
Using Package Manager (Linux)
Enterprise Linux 8 (CentOS 8, RHEL 8, Rocky Linux 8, AlmaLinux 8)
Download and Install epel-release RPM:
sudo rpm -Uvh https://dl.fedoraproject.org/pub/epel/epel-release-latest-8.noarch.rpm
Install awscli RPM package:
sudo dnf install awscli
Enterprise Linux 9 (CentOS 9, RHEL 9, Rocky Linux 9, AlmaLinux 9)
Download and Install epel-release RPM:
sudo rpm -Uvh https://dl.fedoraproject.org/pub/epel/epel-release-latest-9.noarch.rpm
Install awscli RPM package:
sudo dnf install awscli
Amazon Linux 2/ Oracle Linux 7/ Fedora 38
Install awscli RPM package:
sudo yum install awscli
Amazon Linux 2023
Install awscli-2 RPM package:
sudo dnf install awscli-2
Fedora 39/Fedora Rawhide
Install awscli2 RPM package:
sudo dnf install awscli2
Debian and Ubuntu (All Versions)
Update the package index:
sudo apt-get update
Install awscli deb package:
sudo apt-get install awscli
openSUSE Leap
Install awscli-cli RPM package:
zypper install aws-cli
Install Using Homebrew (macOS)
Before installing any packages, it’s a good practice to update Homebrew to ensure you’re getting the latest versions of packages.
Run the following command to update Homebrew and its package list:
brew update
Now, let’s proceed to install AWS CLI. You can accomplish this with a single command:
brew install awscli
Homebrew will automatically download and install AWS CLI along with its dependencies. This streamlined process ensures you have the latest version of AWS CLI ready to use on your macOS system.
Using MSI Installer (Windows)
Download the Latest AWS CLI MSI Installer:
Visit the following URL to download the AWS CLI MSI installer for Windows (64-bit): AWS CLI MSI Installer
Open Command Prompt (cmd) as an administrator and navigate to the directory where the downloaded MSI installer is located. Then, run the following command to install the AWS CLI:
msiexec.exe /i AWSCLIV2.msi
Alternatively, for a silent installation without user interaction, use the /qn
msiexec.exe /i AWSCLIV2.msi /qn
After the installation is complete, open Command Prompt (cmd) and type the following command to confirm that AWS CLI is updated to the latest version
aws --version
If successful, the output will display the AWS CLI version along with other details.
Configuring AWS CLI
Using AWS CLI with AWS Profiles
Using AWS CLI with AWS Profiles allows you to manage multiple AWS accounts or roles conveniently from the command line. Each profile represents a different set of AWS credentials and configuration settings, making it easy to switch between accounts or roles based on your requirements. Here’s how you can set up and use AWS CLI with profiles:
1. Configuring AWS CLI with Profiles
Create AWS IAM User and Obtain Access Key
To create an AWS IAM user and obtain access keys for using AWS CLI with profiles, follow these steps, which are also outlined in detail at the following links:
Configure AWS CLI with Profile / Adding New Profiles
Open a terminal or command prompt and run:
aws configure --profile <profile_name>
Replace <profile_name> with a meaningful name for your profile (e.g., development, production).
Enter the following information when prompted:
AWS Access Key ID
AWS Secret Access Key
Default region (e.g., us-east-1)
Default output format (e.g., json)

Verify Profile Configuration
To verify the profile configuration, run:
aws configure list-profiles
This command lists all configured profiles and their associated configurations.

Switching Profiles
To use a specific profile for AWS CLI commands, specify the --profile option:
aws s3 ls --profile <profile_name>
Replace <profile_name> with the name of the desired profile.
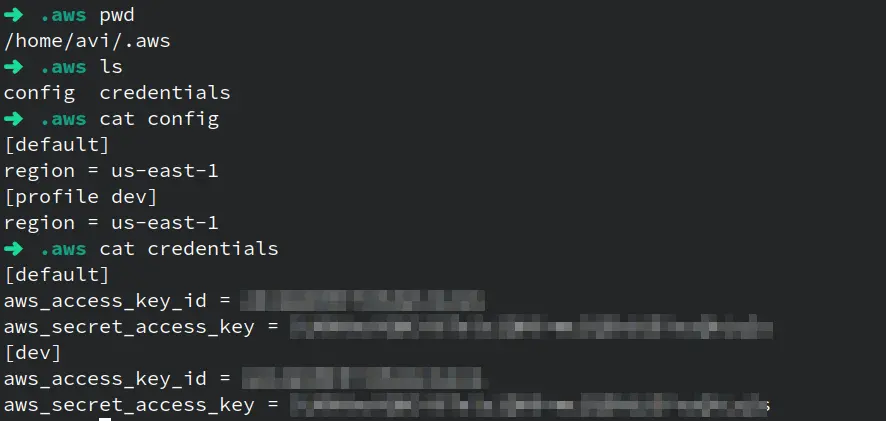
Editing Profiles
You can edit profile configurations manually by modifying the ~/.aws/config and ~/.aws/credentials files.
Removing Profiles
Remove a profile by deleting its corresponding section from the ~/.aws/config and ~/.aws/credentials files.
This article shows how to install and set up the AWS CLI on Linux, macOS, and Windows. The AWS CLI facilitates efficient control of AWS resources, including deploying EC2 instances, managing S3 buckets, and configuring IAM users. Configuring AWS CLI with profiles enables easy switching between accounts or roles, which enhances security.
Using the AWS CLI will aid in performing tasks and managing cloud resources effectively.
Learn more: AWS Command Line Interface Documentation
Got any queries or feedback? Feel free to drop a comment below!