As a developer, you know the importance of having an efficient development workflow. One tool that can help you streamline your workflow is Docker, a containerization platform that allows you to package your applications and dependencies into a container that can run on any system. In this tutorial, I will show you how to install Docker on Linux – Ubuntu, Debian, and Red Hat variants in a few simple steps, so you can start using this powerful tool to boost your productivity.
Table of Contents
Step-by-Step Guide
For Ubuntu and Debian
Uninstall old version
Before installing Docker, you should check if any old versions of Docker are installed on your system and uninstall them. To do this, enter the following command:
sudo apt-get remove docker docker-engine docker.io containerd runcImages, containers, volumes, and networks stored in /var/lib/docker/ aren’t automatically removed when you uninstall Docker. If you want to start with a clean installation and prefer to clean up any existing data, you can follow the instructions in the Docker documentation for uninstalling Docker Engine, which includes removing all images, containers, volumes, and networks associated with Docker: Ubuntu and Debian. After removing the older version of Docker, you can proceed with the installation steps
Update the package list:
Next, you’ll need to make sure your package list is up to date. To do this, open your terminal and enter the following command:
sudo apt-get updateInstall the required packages:
After uninstalling old versions of Docker, you’ll need to install some packages that are required for Docker to run. To do this, enter the following command:
sudo apt-get install apt-transport-https ca-certificates curl gnupg2 software-properties-commonAdd Docker’s GPG key:
Docker’s GPG key is used to verify the integrity of the packages you’ll be installing. To add it to your system, enter the following command:
For Ubuntu:
sudo install -m 0755 -d /etc/apt/keyrings
curl -fsSL https://download.docker.com/linux/ubuntu/gpg | sudo gpg --dearmor -o /etc/apt/keyrings/docker.gpg
sudo chmod a+r /etc/apt/keyrings/docker.gpg
For Debian:
sudo install -m 0755 -d /etc/apt/keyrings
curl -fsSL https://download.docker.com/linux/debian/gpg | sudo gpg --dearmor -o /etc/apt/keyrings/docker.gpg
sudo chmod a+r /etc/apt/keyrings/docker.gpg
Add the Docker repository:
To download and install the latest version of Docker, you’ll need to add Docker’s repository to your system. To do this, enter the following command:
For Ubuntu:
echo \
  "deb [arch="$(dpkg --print-architecture)" signed-by=/etc/apt/keyrings/docker.gpg] https://download.docker.com/linux/ubuntu \
  "$(. /etc/os-release && echo "$VERSION_CODENAME")" stable" | \
  sudo tee /etc/apt/sources.list.d/docker.list > /dev/null
For Debian:
echo \
  "deb [arch="$(dpkg --print-architecture)" signed-by=/etc/apt/keyrings/docker.gpg] https://download.docker.com/linux/debian \
  "$(. /etc/os-release && echo "$VERSION_CODENAME")" stable" | \
  sudo tee /etc/apt/sources.list.d/docker.list > /dev/null
Install Docker:
Now that Docker’s repository has been added to your system, you can install Docker by entering the following command:
sudo apt-get update
sudo apt-get install docker-ce docker-ce-cli containerd.io
Start and enable Docker service:
Finally, you’ll need to start and enable Docker’s service so it will start automatically when you boot your system. To do this, enter the following commands:
sudo systemctl start docker
sudo systemctl enable docker
sudo systemctl status docker
sudo usermod -aG docker USERNAMEReplace <USERNAME> with your username.
After running this command, you will need to log out and log back in for the changes to take effect. Once you’ve done this, you should be able to run Docker commands without using sudo.
Note: Be aware that adding a user to the docker group grants them the ability to run Docker commands, which can potentially be a security risk. Make sure you only add trusted users to the docker group.
Verify Docker installation:
After Docker has been installed, you can verify that it’s working by running the following command:
sudo docker run hello-worldIf everything is working correctly, you should see a message that says “Hello from Docker!”.
For Red Hat variants (Rocky Linux, CentOS, Fedora, and RHEL)
Uninstall old versions:
Before installing Docker, you should check if any old versions of Docker are installed on your system and uninstall them. To do this, enter the following command:
sudo yum remove docker \
                docker-client \
                docker-client-latest \
                docker-common \
                docker-latest \
                docker-selinux \
                docker-engine-selinux \
                docker-latest-logrotate \
                docker-logrotate \
                docker-engine \
                docker-ce
Images, containers, volumes, and networks stored in /var/lib/docker/ aren’t automatically removed when you uninstall Docker. If you want to start with a clean installation and prefer to clean up any existing data, you can follow the instructions in the Docker documentation for uninstalling Docker Engine, which includes removing all images, containers, volumes, and networks associated with Docker: CentOs, Fedora and RHEL. After removing the older version of Docker, you can proceed with the installation steps
Install required packages:
After uninstalling old versions of Docker, you’ll need to install some required packages. To do this, enter the following command:
sudo yum install -y yum-utils device-mapper-persistent-data lvm2Add Docker repository:
Next, you’ll need to add Docker’s repository to your system. To do this, enter the following command:
For Rocky Linux/CentOS:
sudo yum-config-manager --add-repo https://download.docker.com/linux/centos/docker-ce.repoFor Fedora:
sudo dnf config-manager --add-repo=https://download.docker.com/linux/fedora/docker-ce.repoFor RHEL:
sudo yum-config-manager --add-repo https://download.docker.com/linux/centos/docker-ce.repoInstall Docker:
After adding Docker’s repository, you can install Docker by entering the following command:
To install the latest version, run:
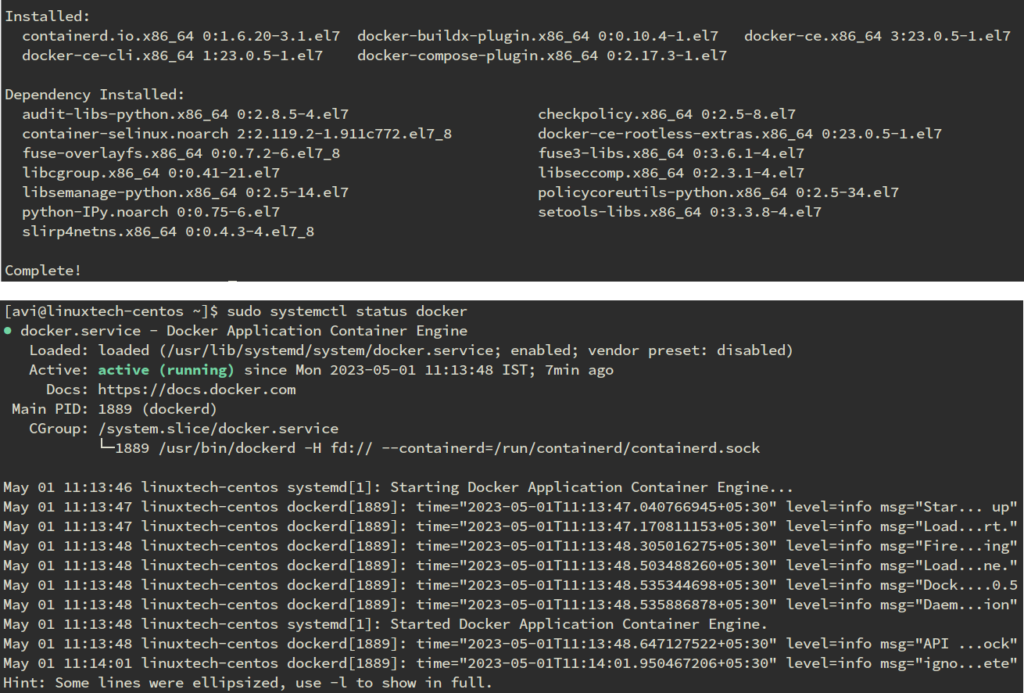
sudo yum install docker-ce docker-ce-cli containerd.io docker-buildx-plugin docker-compose-pluginThis command installs Docker, but it doesn’t start Docker. It also creates a docker group, however, it doesn’t add any users to the group by default.
Install the latest version of Docker Engine, containerd, and Docker Compose or go to the next step to install a specific version:
sudo dnf install docker-ce docker-ce-cli containerd.io docker-buildx-plugin docker-compose-pluginThis command installs Docker, but it doesn’t start Docker. It also creates a docker group, however, it doesn’t add any users to the group by default.
Install the latest version of Docker Engine, containerd, and Docker Compose or go to the next step to install a specific version:
sudo yum install docker-ce docker-ce-cli containerd.io docker-buildx-plugin docker-compose-pluginThis command installs Docker, but it doesn’t start Docker. It also creates a docker group, however, it doesn’t add any users to the group by default.
Start and enable Docker service:
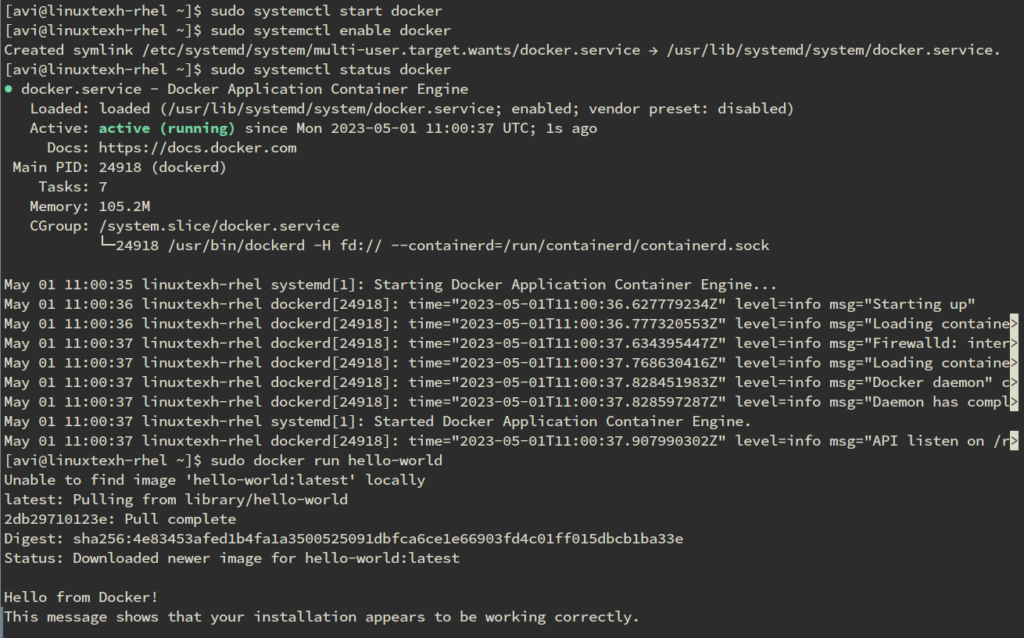
Finally, you’ll need to start and enable Docker’s service so it will start automatically when you boot your system. To do this, enter the following commands:
sudo systemctl start docker
sudo systemctl enable docker
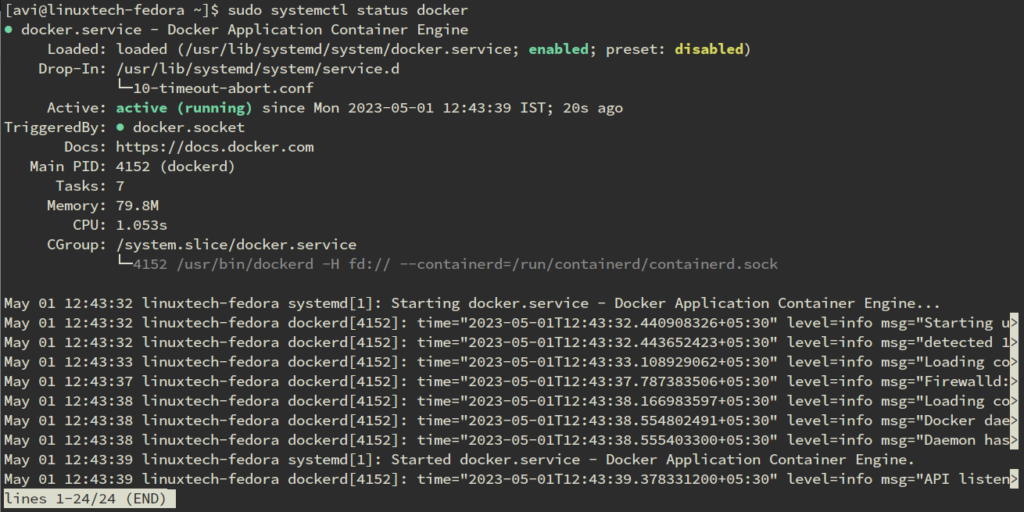
sudo systemctl status docker
sudo usermod -aG docker USERNAMEReplace <USERNAME> with your username.
After running this command, you will need to log out and log back in for the changes to take effect. Once you’ve done this, you should be able to run Docker commands without using sudo.
Note: Be aware that adding a user to the docker group grants them the ability to run Docker commands, which can potentially be a security risk. Make sure you only add trusted users to the docker group.
Screenshots:
Verify Docker installation:
After Docker has been installed, you can verify that it’s working by running the following command:
sudo docker run hello-worldIf everything is working correctly, you should see a message that says “Hello from Docker!”.
Conclusion
By following the simple steps outlined in this tutorial, you can install Docker on Ubuntu, Debian, and Red Hat variants and start using it to streamline your development workflow. With Docker, you can package your applications and dependencies into a container that can run on any system, making it easier to test and deploy your code. Whether you’re developing software for personal or professional use, Docker is a powerful tool that can help you boost your productivity and get more done in less time.
Got any queries or feedback? Feel free to drop a comment below!